Thursday, December 29, 2011

Breaking It Down: Pilates Understood

This blog will help break down the important Pilates principles and will help you better understand your work outs. Enjoy and please don't hesitate to contact me with questions.
  • Pelvic Rocking: First step in practicing Pilates is understanding the concept of a neutral back position. This can be practiced with Pelvic rocking.

Flat Back or Imprint:

Arched Back:


The idea is to find a nice "happy" place for your back between these two extreme back positions that feel comfortable for you. You don't want to feel like you are forcing your back onto the mat, but you also don't want to arch either. You need to be in a place where your abdominals can engage the fullest.
  • Imprint vs. Neutral: It's important to understand when to have an imprint vs. keeping the neutral we just established. This is actually easier than it seems.
Knees up or in table top: Imprint
Feet on the mat or legs Straight out in front: Neutral

When we start to incorporate equipment, this changes; for mat, this is all you need.
  • Basic Abdominal Curl: Here, the two places you want to focus on are the neck and your pelvic area. A lot of times when people do an abdominal curl they will lead with their chin:

When people pull on their neck, or lead with the chin it can put a lot of stress on the traps and cause pain in the neck itself. Notice how my neck looks strained in the picture above.

A couple of helpful cues:
  • Keep your head heavy in your hands, elbows stay wide.
  • Keep your chin slightly tucked with your gaze towards your knees
  • Try leading with your chest, keeping your chin in line with your collar
It should look like this:

Here my neck looks so much more relaxed. I'm also releasing my hip flexors by letting my knees open to the sides. This is another common problem in ab curls. People tend to grip with their hip flexors or overly tuck the tail bone (extreme pelvic tilt):
You can almost see my butt lifting off the mat. It looks like my abs are engaged, but actually, I'm really using my hip flexors and soaz muscles to compensate for my lower abdominals.
To help release the hip flexors, try letting your knees open up to the sides as mine are in the picture above. This will release the tension allowing the lower abs to fire. Even comparing the pictures you can see how much more relaxed my legs look allowing my abs to engage.

Feet in Table Top vs. on the mat: When you are over tucking in table top, or gripping with the inner thighs, it is even easier to notice. As you curl up, to your knees pull in?

Or, can you keep your knees stable throughout the exercise.
If you do notice your knees pulling in, try to butterfly your knees out like before:

When you curl up in an abdominal curl; think about keeping your butt super heavy. This will help to keep your knees stable and your lower abs engaged.

Remember, if your knees are in table top, your back is in an imprint. If your knees are on the mat, you are in your comfortable neutral (meaning there could be two pockets of air on your lower back. Personal Trainer, Krys, at CSC put it best "Back Dimples".


  • Understanding the Pelvic Floor: This is a quintessential part Pilates. It's the idea of lifting through your entire body to lengthen and strengthen. I'll break it down into steps:
  1. Engage the inner thighs slightly, not to the point that your gripping; but as Leah says, "not to the point your walking like a robot, just so if you were wearing short shorts, they wouldn't jiggle..."
  2. Now lift from the pubic region. Think what happens when you go swimming in the ocean in May in New England. Think about the point your pubic zone hits the water... That feeling, is the next part of the lift. You can also think about it as stopping the flow of urine, but that kind of grosses me out...
  3. Pull your lowest abdominals up and in. To practice this, place your hands on your lowest abdominals. Exhale really deep and press your hands in to your abdomen to feel what happens.
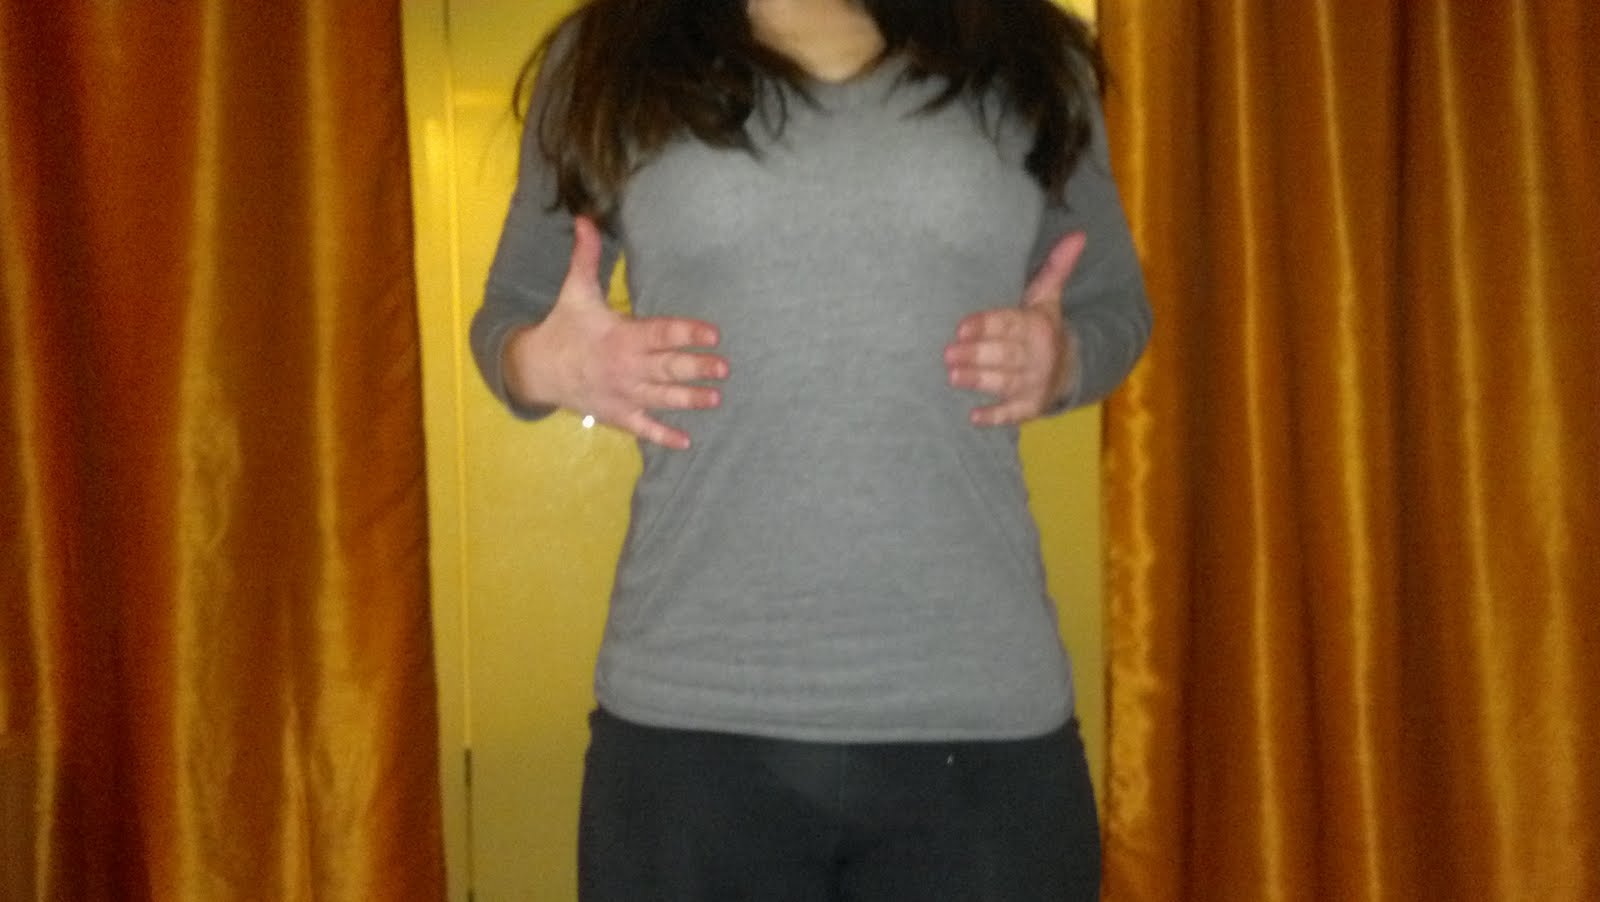
  4. Draw your front ribs towards the back while opening the collar bone. Most people let their upper ribs pop out, especially men. To understand what I'm talking about, place your hands on your upper rib cage. Inhale, feel how your ribs expand:
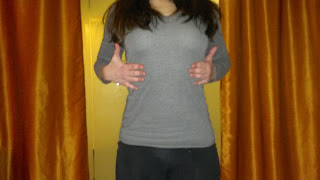
Notice how my hands spread apart and my chest looks open. Exhale deeply and feel how your ribs close together. Now, think about your lowest abdominals pulling up and in causing your cage to pull down. At the same time, try to notice your collar bone. If you are forcing your ribs down, your shoulders will start to hunch. Notice below how my shoulders look like they are rolling forwards. The idea is to only pull in the ribs to the point of lengthening the body and supporting the upper back.To engage properly through the pelvic floor, you will notice a feeling of length. At first, this position is hard to hold. It may even feel unnatural. It does start to feel better as you learn proper posture and alignment. Engaging your pelvic floor unleashes your Pilates power house.
  • Crown vs. Tiara: The crown is the upper part of the head, the tiara is the forehead. Royalty wears crowns, Barbie wears the tiara. Think about always lengthening up through the crown of the head to try make the neck long. The idea in Swan is to lengthen the lumbar out. The head will have the same neutral in all 4's and even c curves and roll backs.
Crown:
Tiara:
    Here my lower back looks compressed as is the back of my neck. The idea is to lengthen from head to toe as in the picture above. Notice how much longer I look.

    • Rib Hip Connection: Pilates is all about the integration of your rib and hip connections. Think of an abdominal curl, you are simply sliding your ribs towards your hips.
      Think of a C curve... Same thing as the ab curl; sliding ribs towards hips.
      Most Pilates exercises have a "paper doll" like effect. Simply rotate the picture, and one exercise will look like another. Understanding these similarities will change your work out.
    C Curve Side View:

    C Curve in all 4's


    Hope this helps! Enjoy your work outs and happy holidays.

    Tuesday, December 27, 2011

    Body Pump Moves with Proper Technique: A Perfect Lunge


    The most important part of performing a perfect lunge is the set up. First things first: Feet hip width apart. To ensure that your feet are actually hip width apart, place your thumbs pointed down on your ASIS (hip bones). If your thumbs point to your toes, your in good shape.

    Next step: Setting up the Lunge


    Keeping your feet hip width apart, kneel onto the floor like you are about to ask someone to marry you (don't worry, no commitment necessary). Make sure your front and back knees are in a 90 degree angle as in the picture below.


    Now that you are there, simply tuck your back toe and stand up. It's okay if your front toe is pointed out (away from you) just a little bit. Next step, grab a weight. Body Pump style uses a bar. Same rules apply in bar placement as in the squats. Actively rest the bar on the meaty part of your back. Notice that my arms are still active and engaged throughout the exercise.


    Just like squats, it's important to keep your chest high. If you are using the bar bell, make sure your elbows point directly towards the mat. If your elbows aren't facing the mat, most likely you are leaning forwards.

    Here my elbows point to the back of the room. I'm also not in a 90/90 position for my lunge. If this looks like your lunge, return to step 1 to try again. If your lunge looks like the lunge below, good job! We are ready to start.
    When performing a proper lunge, remember,
    • Back knee leads the way (keep it elevated just about an inch from the mat at your lowest point, slamming your knee on the ground really hurts...)
    • Drive through the front heel to return back to standing. Your back knee should always stay a little bent.
    **Extra Credit

    To engage your obliques, try holding one plate in your hand opposite of the leg in front. e.g. If your left leg is in front, do the lunge with the weight only in your right hand. It will be harder to keep your chest tall because you will feel unbalanced. This is forcing your core to engage.


    Tuesday, December 6, 2011

    Body Pump Moves with Proper Technique: Bench Work; Tricep and Chest


    Using A Bench:

    When we do the chest track or tricep track in Body Pump, we are usually laying on a bench. It is so important to keep your abdominals engaged to support your back. This is going to protect your back from strain. When the lower back comes off the mat, it is not supported, resulting in pain.

    Notice how arched my back is. This is not working the proper muscle groups and can really hurt.
    Notice in this picture, my abs are engaged, supporting my lower back. My shoulders are drawn down away from my shoulders and my feet are hip width apart. This is perfect position for any bench work.

    The second major issue when using benches for chest press or Tricep press is hyper extension of the clavicle. It is so important to keep your elbows in line with or above the bottom edge of the bench. Notice how my elbows are at a perfect right angle, no lower than the bench.

    This is the perfect form for a chest press. My elbows are in a safe zone. We have to think this line as an imaginary floor. In the second image, you can see that this line is broken. Notice how it changes the position of the chest press.

    You can see the strain in my neck, my shoulders struggling to stay down and back and even a little pressure on my back. If you find it difficult to feel this location, try doing these exercises on the floor. This will make it impossible to bring your elbows into a compromising position since you can't really put your elbows through the floor...

    Triceps Vs. Chest:

    The different hand position on the bar is important for targeting these specific zones. A chest press you keep your hands super wide on the bar. For Triceps, your hands stay in line with your shoulders. Both situations require a straight wrist, a straight line from your knuckle all the way to your elbow.

    It is so important to keep your wrists in this straight position throughout the entirety of the exercise. A broken wrist, or bent wrist, places unnecessary pressure taking the weight of the exercise out of the muscles intended and into the joint. It's similar to locking your knees in squats or dead lifts; this movement takes pressure off the target muscles straining the joints instead. Definitely not ideal for results!

    Broken Wrist:

    Wrists in Good Form:
    The broken wrist example applies to the chest press as well, but is easiest to see in the Tricep extension.

    Elbows In for Tricep Wrok:

    In order to keep the pressure of the bar in your triceps, it's important to draw your elbows in towards the center of your body. You want to keep your elbows in line with your wrists. This will isolate your triceps, giving you the best results possible.
    Notice in this picture my elbows are in perfect alignment with my wrists which are in alignment with my shoulders. Below you can see my elbows going out as opposed to remaining parallel.


    This is causing tension on my back, resulting in my shoulders rising up putting pressure on my traps.

    Use these tips and see how much faster you get results!

    Monday, December 5, 2011

    Body Pump Moves with Proper Technique: A Perfect Dead Lift

    Dead Lifts:

    This is the most common exercise leading to injury. It's so important to do this correctly. First, like squats, keep your knees soft at all times. The knees stay in one position throughout the exercise. As you bend over, the knees do not bend more, but stay stable.

    This exercise requires a proper abdominal connection to support your back so as you bend over, your back stays flat. Think of it as hinging from the waste and sticking the butt out as you go down. Keep your eyes about 6 feet in front of you on the floor. As you stand up, squeeze your bum and drive your hips forward. You will feel this in your glutes, lower back as well as your hamstrings.

    In order to keep a flat back, the shoulders must remain down and back throughout the exercise. To highlight this feeling, simply roll your shoulders down and back before you start the exercise. This will give you the feeling of proper engagement. Try to sustain this position throughout the movement. They will want to migrate up towards your ears. Be aware and try to take control.

    Starting Position:
    Notice how my shoulders are drawn back. My abs are engaged supporting my lower back. It's almost as if I'm over-emphasizing the shoulders, but this is important. As soon as you start to hinge forwards, the shoulders are going to want to slide towards your ears. You have to make a conscious effort to keep them down and back.

    Notice in the down position of my dead lift. My eyes are on the floor 6 feet in front keeping a straight line between the crown of my head and my tail bone. My abs are pulled in supporting my lower back. My knees are soft, but not bent and my butt is sticking all the way out. As you stand up, drive your hips forward and return to your starting position.

    Below are common mistakes I see in almost every Body Pump class.
    Notice how my chin is up. This is putting strain on my back and my neck. My shoulders are rounded forwards and my butt is not leading the movement. This position hurt to shoot, yet I see it every day. My abs were not engaged so my back was not supported and my shoulder position and neck position are causing strain on both the lower and upper back.
    This down position is rounded. Although my head is correct, my knees are bent, not soft. My abs are loose and there is tons of pressure on my lower back. Always remember, keep your back flat.

    Thursday, December 1, 2011

    Body Pump Moves with Proper Technique: A Perfect Squat


    Squats:

    The perfect squat requires an abdominal connection. Use your abs to keep your chest up. Engage your core as you sit down and back, really sticking your butt out. It's so important in a squat to keep your chest up or your lower back will experience pain since it is unsupported.

    Notice my chest is high, my but is back and my knees are in line if not behind my toes. Weight is in my heels. This is the proper alignment for your squat. Keeping your knees in line or behind your toes and the weight in your heels takes away unnecessary pressure on your knees. Below is a picture of what not to do.
    Notice how my chest is low putting pressure on my lower back. You can also see that the weight is on the balls of my feet causing my knees to come forward. Even holding this position for the camera shot hurt my back and my knees. Definitely, don't try this one at home.

    If you are new to squats, you may feel a bit unbalanced, which is why most people lean forwards to begin with. Try putting your hands in front of your body to stabilize, or sitting onto a chair or bench while maintaining weight in your heels and keeping your knees behind your toes. Once you get good, try to hover your bum off the chair or bench and stand up. Make sure at the top of your squat your knees stay loose.

    Locked vs. Unlocked Knees:

    At the top of your squat, it is common to extend the legs until they lock. This at first gives you a sense of relief at the top. It does take the work out of your muscles, but it does that by putting a strain on your joints. Repeated effects of locking the knees can be severe and even result in knee replacement surgery. This is easy to avoid, but hard to remember.

    Locked Knees:
    Soft Knees:
    Notice in the second picture how my knees are soft? There is a difference between soft and bent. The best and easiest way to make sure your knees are soft is by engaging your inner thighs. As you drive through your heels to lift out of your squat, feel like you are pulling your heels together without actually moving them. This engagement will make it almost impossible to lock your knees. Plus, you'll get a better work out in general.

    Adding Weight:

    In Body Pump, we add weight by using a bar bell. If you are still experiencing difficulty with your proper squat form, or it's your first time adding weight, try one plate instead of the bar. Hold the bar with two hands between your legs. Make sure that your shoulders are drawn down and back and your abdominals are engaged. This will also help to balance you if you feel like you are falling backwards.

    If you are using a bar bell, it's important to place the weight correctly on the meaty part of your back. Having the bar bell as a tool, can also reinforce keeping your shoulders back and your chest high. Your elbows will be your guide. If you are using the bar, your elbows should always point directly at the floor. This ensures your chest high.

    When holding the bar bell, your arms should be engaged, holding the weight of the bar. Try not to let the weight press into your shoulders or back. With heavier weight and more reps this becomes more difficult. Be aware, and use your arms to protect your neck and upper back. It's also important to know where the meaty part of your back is, notice I didn't say neck.

    Proper Placement for Bar:
    Notice the bar is below my neck line, my arms are engaged and my elbows are pointed at the floor. Normally my head would be up, but in order to show the placement, it was important my pony tail didn't get in the way.

    Bar Resting on Neck:

    Here the bar is resting too high on my back. It is actually on my neck. I was trying to let it sit on my back, but the pressure was too much and needed to engage my arms to protect myself.